Showing posts with label Nails. Show all posts

Wednesday, 24 December 2014

REVIEW: Ciaté Caviar Manicure


I received this Ciaté Caviar Manicure set as a birthday gift from a friend! I've been out of the whole nail art thing for a few years now. I used to do all sorts of patterns and designs, then I stopped painting at all for a good year, and only recently got back into the habit of painting my nails. Although just plain colour and that's it.

So this is a nice and easy way to make my nails look more interesting than just a plain coat of colour!


You get a bottle of caviar micro pearls, a bottle of black nail polish, and a funnel.

Close up of the caviar pearls

It was my first time using this, and I only did the ring fingers of each hand as I think doing all of them like this would be too over the top.

It's important to keep everything in the packaging, as the plastic lid doubles up as a tray to catch the pearls when you pour them over your nails, and makes it easier to pour back through the funnel into the bottle, to reduce any wastage!

For my first experience trying this out, I did find it difficult to get a nice even spread of pearls. There are some gaps on the nails that are not covered! I need more practice. I'm not used to the feeling of having things stuck onto my nails, the raised texture and all. Also paranoid that the pearls are going to drop/fall off into my food and I'll end up eating it...

In the included booklet, it said that the best way to seal the pearls is to apply a top coat to only the tip of the nail?


You can see the little gaps in the photo. It's an interesting look... I'd never do this to all of my nails though. Reason being is that when they start to fall off, it'll be uneven and start to look a bit mank! One nail on each hand is enough for me.

This product isn't something that I would by for myself. It was nice to receive it as a gift though, as I've got the chance to try it out, something I never thought of anyway.

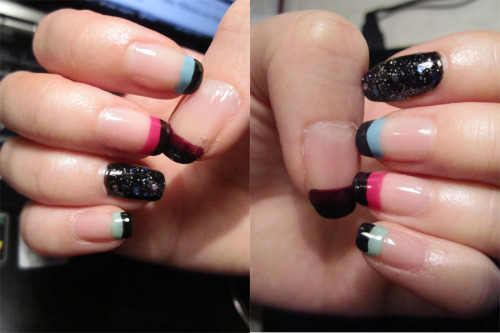
I'll be a good pairing with my Tsubasa inspired nails I used to rock a few years back! 

Saturday, 16 February 2013

Review: BarryM Texture and Gelly Paints

So today I impulsed bought 2 nail paints by BarryM, because I saw them on offer at Superdrugs! 2 for £6... lol. I haven't actually painted my nails for a long time since I've been at uni and I can't be bothered. But now I'm at home in London for a few days I've quickly picked up my old habits hahaha.

These are the colours I got:
[Left]Textured Nail Effect in Atlantic Road. [Right]Gelly in Lychee
No top coat
No top coat
Tried them both on, I didn't really know what to expect from these as I haven't read any reviews on them before. I really like the Gelly Lychee, the colour is so nice and neutral. It paints on thinly as well which is good, the consistency of the formula is great! It's extra glossy too so you don't really need a top coat ontop of it :) But I do it anyway.

As for the textured effect, I'm not entirely a huge fan... It's an interesting effect but I'm a person that likes to use top coats, and upon applying it, it obviously smoothed out the textured effect so it's less textured, see the photos~
With top coat
With top coat
 If you look really really close, there will be small tiny bubbles with holes in it... I think the colour is good for summer, kinda like an ice cream, melted ice cream colour.

Ratings:
Textured Nail Effect in Atlantic Blue: ★★★☆☆
Gelly in Lychee: ★★★★★

Thursday, 22 September 2011

E.L.F Matte Finisher Nail Polish

I got this product in my previous E.L.F haul (RRP £1.50) but at the time, E.L.F were doing a 50% promotion, therefore I got it for 75p! What a steal! I love E.L.F so much, though sadly, they are not going to do any more 50% off offers! They are still really good value for your money so I really recommend you check them out if you haven't already!

Click HERE to see their website.

Anyway, moving onto the review~

Here are some photos of what the matte finish looks like compared to the usual shiny finish:

Matte:


Normal:


Ahh... I think it may be hard to tell the difference from the photos? >.< aiiish. Well, I think it gives off a nice finish, and I really like it. In my opinion, it makes the nails more cuter (though it may just be the polka dot design haha)

I would say this was a nice buy and I'd definitely it again! :)

My Nail Polish Collection.

So this is all of them.


The elastic bands on the lids are because I do that when I can't open it (it gives you better grip and then opens easily!) But yes, Some of them I really hate lol >_>

Sunday, 14 August 2011

Tsubasa Inspired Nails

I haven't painted my nails for while, and so today I decided to do Tsubasa inspired nails.
I came across this photo of her:


I liked her nails so I attempted it myself (this is my second time doing this by the way!)
I find it pretty easy to do as it's only painting the tips, except for the one black nail of course. One difference I've done is instead of drawing the heart and bow on the black nail, I've just used glitter nail polish (as that looks really time consuming to do >.<). Using glitter nail polish (the ones with the little AND big specs) still look pretty to me! But of course if you're skilled enough to draw the heart and bow, please do so! Also, obviously you can use any colour you want as I have :) I'm sure some of you won't have the exact same colours that Tsubasa has on, or mine, so choose whatever you like. I myself don't have a baby pink so I used a blue instead hehe. Here are mine:


And a nail tutorial~!


Now I'll give you the polish details that I used :)


Staring from left to right:
MoYou - Yellow
NYNC - Fuchsia
BarryM - Vivid Purple (161)
BarryM - Pure Turquoise (295)
BarryM - Black (47)
N.Y.C. - Starry Silver Glitter (105A)
L.A. Colors - Base Coat
Topcoat

More photos ^0^


Sunday, 3 July 2011

I haven't been able to paint my nails for months now, simply because... well, I couldn't be bothered, and had no time because I had exams to study for.
Now that I have some time to kill, I've done this:


Saturday, 23 April 2011

Nail Art?

This nail design was from around February. 
Painted my nails today since I had free time. Its been 4 months since I last painted them.

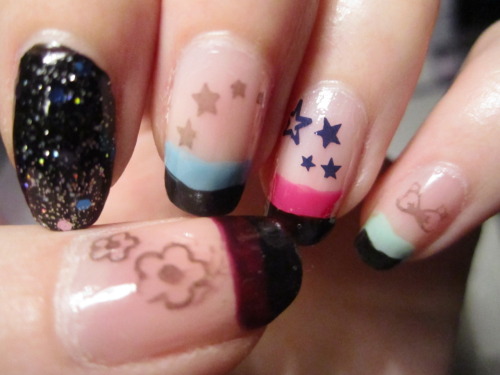
The stars, flowers and bow are printed on by using this nail art thing I purchased in westfields! It's called Moyou, and it is really easy to use!


Experimenting~

Tuesday, 5 April 2011

Black magic tip.

I noticed that to get bigger cracks, you need to do harder brush strokes. If you do a light one, the cracks will be small... if you look at my index finger, that is the best pattern I achieved out of all my strokes, due to pressing hard with the brush.

So more pressure = better cracks.


Monday, 4 April 2011

Nails

I'm posting this from my phone so I don't know the layout of this post ><
So the first photo, I painted my nails with a brownish purple colour, then put a layer of glitter on top.

Second photo, barryM black magic.
That was just an impulse buy as I passed superdrugs haha, went in to check it out, then thought I might as well buy it. My intention was to buy a fluffy eye shadow brush and brown smokey eye shadow palette, but I didn't get either.

BarryM isn't bad, still gotta try OPI and see if there is any difference at all, except got the very different prices!

- Rachel xx


Related Posts Plugin for WordPress, Blogger...