Thursday, 26 June 2014

Makeup Brush Collection

I've decided to share with you all the makeup brushes I currently own and use!


All of these brushes I purchased about 4-5 years ago and they have stuck with me ever since, they have lasted me for so long with no problems as I take good care of them. As you can see, the majority of my brushes are from E.L.F,

These brushes are so durable, soft and good value for money, very affordable! I recommend their Studio brushes (which are the black handle ones).

From left: e.l.f Studio Blush Brush. e.l.f Professional Bronzing Brush. Body BC Collection Foundation Brush.
I use the e.l.f Studio Blush Brush and the BC Body Collection foundation brush all the time. I don't really use the e.l.f Professional Bronzing Brush as I prefer to use the stipple brush when I wear bronzer, which is not often at all. It could be used to apply blusher but I prefer the studio blush brush.

From Left: e.l.f Studio Angled Eyeliner Brush x2. Ms. Makeup Angled Eyeliner Brush. Maybelline Gel Liner Brush. Makeover Essentials Eyeliner Brush.
Out of all of my eyeliner brushes, I only use the e.l.f Angled Eyeliner Brushes as these give me a thin and precise line. I honestly never went back to the other brushes after I tried the e.l.f one, and because it is angled at the head, application and drawing is easier than the average straight brush.

From Left: e.l.f Studio Eyeshadow "C" Brush. e.l.f Studio Contour Brush. e.l.f Professional Blending Eye Brush. Makeover Essentials Eyeshadow Brush.
I use the contour and blending brush the most out of these eyeshadow brushes. But the brush I use the most would have to be the one that comes in the Naked 2 palette as I use that palette the most.

e.l.f Studio Stipple Brush
I have two of these brushes, I don't remember why I purchased two. Probably because it is so cheap and worth the money my greed kicked in ahahaha. I use my stipple brushes to apply my foundation as I prefer a light coverage. Also use them to apply bronzer when I decide to wear it. So in the end the two brushes came in handy, one for each role!

e.l.f Studio Powder Brush and e.l.f Studio Complexion Brush
Again I have two of the exact same powder brushes, I use this to apply HD powder as I find the flat head of the brush is perfect for buffing and helps to achieve a flawless look. I actually have another unopened e.l.f Studio Complexion Brush that isn't pictured here! I use this brush when I feel like dusting HD powder over my face instead of buffing it in, or when I apply the e.l.f Complexion Perfection which is a pressed complexion powder in a compact.

The highlight of these brushes would be the e.l.f Studio Brushes. If you're on a budget or not willing to splash out on MAC brushes or an alternative, then I'd highly recommend you go get these as they are so affordable and I love them. I'm going to update my brush collection with more e.l.f brushes as I need a concealer brush and I want an angled foundation brush too!

Also if anyone is curious, I use Johnson's baby shampoo to wash my brushes with, as it is cheap and mild and will last you for a while too. I aim to wash my brushes every week or two! You should keep your brushes clean to prevent bacterial build up on the brushes which will transfer to your face, this will keep spots and acne growth at a low if anything.

Wednesday, 25 June 2014

Review: Garnier Fresh Refining Toner

I recently ran out of my usual Toner I use, which is Lancôme Tonique Douceur, and I couldn't get more for a week since that was when I was going back to London from uni.

So I decided to just pick up a drug store toner to use temporarily until I restock on my Lancôme one.

I picked up a Garnier Fresh Refining Toner, which claims to purify, tone and tighten pores. It is enriched with Green Tea and Moringa extracts, and for combination to oily skin.


BOY WAS THIS A MISTAKE.
When I applied this to the face, it had a really strong alcohol like smell that went up my nose in an irritable manner. I can't stand it.

My boyfriend also said that it stung his face when I applied it to him.

I do not recommend this product. I give it a one star rating as I will never ever touch this product again. Throwing mine away.

★☆☆☆☆

Tuesday, 24 June 2014

Review: Nudy Grey Lenses

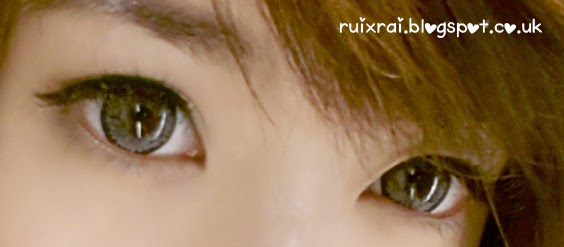
Today I will be reviewing my Nudy Grey Circle Lenses by Sexy Me! As requested by Huewinn =P

I think this is some random brand as I purchased these lenses (along with Nudy Brown, haven't opened yet) when I went to Vietnam last summer 2013. It was about £7 for each pair (so cheap I love it!) and they are yearly disposable.

Here is a photo of what they look like in the case, this is the view from the inner side of the lenses that's why the colour seems quite light. Also, isn't my lense case cute? Sabrina got them for me heheheh ^-^
 Now here are some close up of my beautiful eyes~~ hahahaha


10/10 for design and comfort, the only issue is my eyes get dry if I wear them for a long period, but that happens with any pair, any brand. I don't use eye drops either, maybe I should.

I've received a lot of compliments about these lenses, the pattern is nice, and the effect is also nice, the eye enlargement is also good. As will all circle lenses, they will give you a dolly eye like effect, if you're into that then I'd definitely recommend nudy grey as I personally really like them, and will buy these again once they expire! 

And just as a little extra, here's more photos of my travel lense case that I currently use (from Sabrina <3)

You can tell it's from Asia because of the ENGRISH

The top tweezer is for taking out the lenses from the case so that you don't have to dip your finger into the case and get your finger tip all well. Very useful. The middle tube is just to carry some contact lense solution around with you just incase you need it. Then finally, the case itself. All of the things have their own slots to keep them in place, also there's a mirror inside!

Sunday, 22 June 2014

Experimenting with colour: Eyes

My everyday eyes usually consists of nude, natural colours found in the Naked 2 palette, but i'll talk about that in another post.

So for today's post, I tried to add a bit of colour to my eyes, as it is now summer and time to be colourful!

From left: Eyeko Eye Do Mascara, Shu Uemura Lash Curler, E.L.F 32pc Eyeshadow Palette in Everyday, Eyeko Skinny Liquid Liner in Navy, E.LF Mineral Eye Liner in Coffee, and finally, Bourjois Lady in Black false lashes.
The E.L.F 32pc eyeshadow palette may look plain but that's because the colourful part is hidden! Here is a photo of the full palette:

Don't mind the holes... you can see how much I used it in the past haha
I stopped using this palette ever since I got the Naked 2 last year, but decided to take it back out again today.

I used the brown on the right (with the massive hole) as the base colour on the lids, then used the dark blue (middle bottom with massive hole) on the outer corner and extended it above the crease. The final effect turned into a purple shade, I had to put more brown onto the lids after applying the blue to make my lids pop more.


The Bourjois Lady in Black gives quite a natural look, until you look from the bottom or top and see the added gems. These lashes are quite different as they are half lashes which you apple to the outer corner of the eyes, I usually use full lashes, so this is new for me.

The Eyeko Skinny Liquid Liner in Navy is still dark enough to pass off as black, with a tiny hint of blue. I tightlined my upper waterline in a brown eyeliner by E.L.F to fill in the blank space.

This could be an everyday look for me in summer, I'll experiment with different colours and post here, although I don't think the lashes are for everyday wear haha.

Thursday, 12 June 2014

Mascara Hack

Hello Everyone!

I've always had a problem with eyelash fall out when I try to remove waterproof mascara, but now I have found a way to easily remove it!

First off, curl your eyelashes to how you want them. Then, you apply one coat of normal mascara. That's right. Then after that, you then apply your waterproof mascara over that. Same effect, but makes it so much easier to remove after!

Hope you enjoyed this short tip!
Related Posts Plugin for WordPress, Blogger...