
Thursday 8 December 2011
Hair up-date
Cut my hair today! My bang was outgrown and the way it looked got on my nerves so I decided it was time to cut it.
At the moment I am currently trying to grow my hair long again, but it is taking ages >_< my hair grows so slowly... Plus as you can see in the video, my hair is so DEAD (the ends... the brown/orange parts) So dry! I don't want short hair though so i'm not cutting it off. I'll just eventually cut it off as my hair grows out *sigh*
Sunday 13 November 2011
Hair time-line for this year!
Out of all the 6 six years i've been dying my hair various shades of brown, with the random purples, pinks and reds in the early stages... this year i've dyed it the most frequently.
I put together a time-line of photos of my hair starting from late December onwards to this present day, check it out.
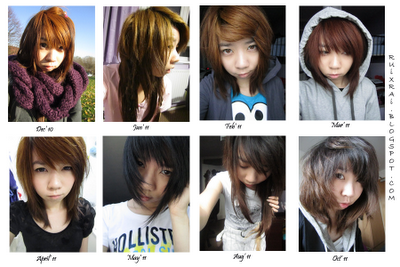
Once I dyed my hair back to black, I said to myself that I wouldn't dye my hair anymore, give my hair a break. However, the jet black faded and as you can see, my current hair is natural black ontop, and the ends are brown, so I have gradient hair...
Whilst I was putting together the hair timeline, my urge to dye my hair grew stronger. Shall I go back to orange hair? Dye it some shade of brown again?
I am bored of my hair now, and I feel like doing something to it. Not cut it because I am currently trying to grow it out.
Friday 23 September 2011
E.L.F. Natural Lash Kit

I've never been a person to wear false lashes (even though I naturally have short lashes) I find them really long and hard to put on. I'm usually always rushing so I don't have time to put them on.
On the last E.L.F 50% off promotion, I decided to get 2 pairs of these lashes. I now have 3 false lashes all together (the third being Eyelure).
Once I received these lashes, I tried them on and trimmed them down to fit (so I don't have to do it later and waste time). Here is are some photos of me with the lashes on:


I like these, they make my eyes pretty, but these took me so long to put on properly... I need more practice... for 75p, it's well worth the money, though you can buy better on ebay? So if you can, just buy from ebay... you get more for your money on there for false lashes haha.
The glue supplied in the box is clear and dries clear. I found it stick pretty well, however when I was taking it off, it kind of hurt a little... I'm not sure if that's normal or not... perhaps it was just because I may have put them on wrong or something? It got stuck to an eyelash (just one) and that hurt. Other than that, all is good!
Thursday 22 September 2011
E.L.F Matte Finisher Nail Polish

Click HERE to see their website.
Anyway, moving onto the review~
Here are some photos of what the matte finish looks like compared to the usual shiny finish:


Ahh... I think it may be hard to tell the difference from the photos? >.< aiiish. Well, I think it gives off a nice finish, and I really like it. In my opinion, it makes the nails more cuter (though it may just be the polka dot design haha)
I would say this was a nice buy and I'd definitely it again! :)
My Nail Polish Collection.
So this is all of them.

The elastic bands on the lids are because I do that when I can't open it (it gives you better grip and then opens easily!) But yes, Some of them I really hate lol >_>

The elastic bands on the lids are because I do that when I can't open it (it gives you better grip and then opens easily!) But yes, Some of them I really hate lol >_>
Deepest Apologies.
Hello. It's been a while. I haven't really had much to blog about lately, with the whole preparing for university thing going on right now, my life is not that interesting and I've been busy trying to sort stuff out!
3 more days left until I leave my home and move into university halls. Am I excited? Not really to be honest, it still hasn't sunk in yet. It will probably hit me when i'm all alone in my room with a bunch of new people as my flatmates for the next year. Will I cry? I don't know yet, I'm unpredictable... I have to say I don't cry easily, but we shall see. Hahaha.
And that's it, that's my update.
I have a few posts coming up now though! :D
Oh and this came today:

My third E.L.F Haul!
I'll be doing product reviews on ALL of my make-up, and my daily skin care routine too, later on~~
3 more days left until I leave my home and move into university halls. Am I excited? Not really to be honest, it still hasn't sunk in yet. It will probably hit me when i'm all alone in my room with a bunch of new people as my flatmates for the next year. Will I cry? I don't know yet, I'm unpredictable... I have to say I don't cry easily, but we shall see. Hahaha.
And that's it, that's my update.
I have a few posts coming up now though! :D
Oh and this came today:
My third E.L.F Haul!
I'll be doing product reviews on ALL of my make-up, and my daily skin care routine too, later on~~
Sunday 14 August 2011
Tsubasa Inspired Nails
I haven't painted my nails for while, and so today I decided to do Tsubasa inspired nails.
I came across this photo of her:

I liked her nails so I attempted it myself (this is my second time doing this by the way!)
I find it pretty easy to do as it's only painting the tips, except for the one black nail of course. One difference I've done is instead of drawing the heart and bow on the black nail, I've just used glitter nail polish (as that looks really time consuming to do >.<). Using glitter nail polish (the ones with the little AND big specs) still look pretty to me! But of course if you're skilled enough to draw the heart and bow, please do so! Also, obviously you can use any colour you want as I have :) I'm sure some of you won't have the exact same colours that Tsubasa has on, or mine, so choose whatever you like. I myself don't have a baby pink so I used a blue instead hehe. Here are mine:

And a nail tutorial~!
Now I'll give you the polish details that I used :)

Staring from left to right:
MoYou - Yellow
NYNC - Fuchsia
BarryM - Vivid Purple (161)
BarryM - Pure Turquoise (295)
BarryM - Black (47)
N.Y.C. - Starry Silver Glitter (105A)
L.A. Colors - Base Coat
Topcoat
More photos ^0^


Friday 12 August 2011
Hair Accessories
I think I buy waaaay too many hair accessories, for a person that rarely wears any!! I just can't help myself.
Here is a photo of all my alice bands / headbands lol:

The breakdown

These 3 are in the "Anime expo/Dress up" category. As you can see, they are pretty over the top and not really suitable for everyday wear haha.
Where I got these
The furry ears - I made them
The cat ears - Claires
The big bow - DIY, I took the bow off from an old top of mine and just attached it to a plain black alice band.
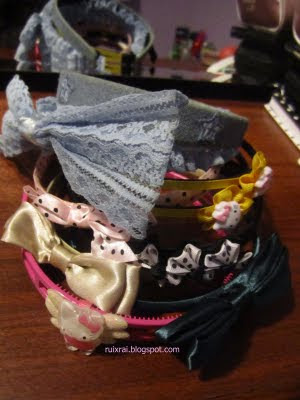
Now these alice bands all have something attached to the side of it, which I consider to be more wearable everyday. However, I've grown out of the whole wearing Hello Kitty and bows on my head for now (It makes me look like a child!) I'm trying to look my age at least... aha xD
Where I got these
Starting from the top
Denim blue alice band with star detail - Claires
Blue bow alice band - Vietnam
Yellow Hello Kitty double alice band - Vietnam
Pink bow polka dot alice band - Claires
Black alice band with black&white bow detail - Claires
Cream white bow alice band - Primark
Green (It looks black in the photo for some reason :/) bow alice band - Primark
Pink Hello Kitty double alice band - Vietnam

Just your average plain coloured alice bands, not going to bother saying where I got these because you can pretty much get them anywhere!

My headbands. I wear these the most out all of the above, except for the blue one, I use that to keep my hair out of my face during my skincare routines. The wrap-around band has been used a few times since I got it about a month or so ago? The plaited double band was used when I had brown / orange hair, it stood out more on lighter coloured hair, I don't wear it any more since I dyed my hair black again (although my hair is gradient black to brown atm lol). Worn the black flower out 2 times only, I think it's too much tbh haha.
The feather ones I actually got today! I've never really been a fan of the whole feather thing... but something just drew me to it today (impulse buy) and I actually quite like them :) I'll be wearing these when I go out (THAT'S IF MY MUM LETS ME OUT!).
Where I got these
Wrap-around band - Primark
Blue band - New Look
Both feather bands - Primark
Black plaited double band - Claires
Black flower band - Claires
Now for my hair clips:

Erm, I'm not going to say where I got these, because they are pretty average? But if you want to know then just ask me.
And finally, my hairbands:

That's it for this post! Thanks for reading :)
Thursday 11 August 2011
E.L.F Haul
A few weeks ago, E.L.F did a massive offer (50% of when you spend £30 or more)! I couldn't resist that and just had to do some shopping! I told my cousin about E.L.F the day before as she had never heard about it, then the next day they do this offer?? How lucky are we!
Me and her decided to order together since we'd be at the same office anyway, and also to reach the £30 mark faster. In the end, we went over haha. We added some nail polishes in at the end last minute.
Here is what I got:
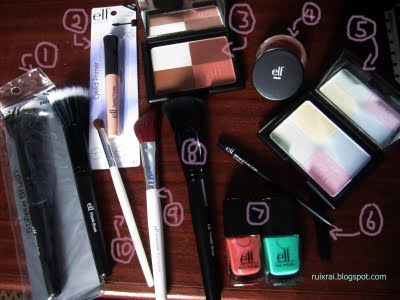
1 - 2 Studio Stipple Brushes
2 - Eyelid Primer
3 - Cool Bronzer
4 - Blusher (Peachy)
5 - Complexion Perfection
6 - Mineral Eyeliner (Coffee)
7 - Nail Polish (Champagne & Teal)
8 - Studio Powder Brush
9 - Blusher/Bronzer brush
10 - Blending Brush
Pretty happy with the stuff I got! I am pleased with the brushes (I wish I got another blusher/bronzer and powder brush!! Oh well... next time haha). Though The blending brush is a little... bad? As in quality wise, it isn't as soft as the other brushes =T But I haven't used it yet so I don't know.
I honestly don't know why I got 2 stipple brushes, I don't need them :/ Oh well... aha maybe because I don't use foundation at the moment? Save that for later then...
This is the first bronzer I've gotten, ever. I've wanted to get some for a while but I didn't have brushes for it or anything yet, so this was the opportunity to get it all at once! Pleased with this product too :)
The Complexion perfection is also good, I use that instead of my translucent powder now haha xD
I'm disappointed with the nail polishes, I thought the colours looked nice on the website swatches, but when I put it on, It was disgusting (in my opinion). The teal colours comes out green more than a teal ): and the champagne one is just horrible. I'm not going to buy nail polish online any more, this was my first time as well, never again. It's a hit and miss because sometimes it will look nice in the bottle, but when you put it on it's totally different. Going to stick to my Barry-M and Beauty Base polishes ha.
Wednesday 10 August 2011
My cosmetics collection (so far)
Just thought I'd share my collection with my readers ^-^
I'm not a make-up enthusiast or anything by the way. Here's a photo of all my cosmetics:

Is that a lot? I've seen people with much more, but then again, I've seen people with barely any... lol. I don't use all of the products pictured there _^ Some of it is un-opened, some is really old (I like to keep old/expired make-up for art haha)
Out of all of that, these are the ones I do use:

AAAAAND these are the ones I use for my "everyday casual going out face" haha:

Um, I might review some products (if i'm bothered, i'm really lazy) I'll do some with my new E.L.F products sometime soon though!
And I was thinking of making a video of my daily routine for my youtube channel? I shall see~~
Tuesday 9 August 2011
Netherlands
I went for a 5 day trip to the Netherlands! (Holland and Germany)and loved it! The only bad thing was that it was only 5 days long ): Definitely want to go back there one day, it's really nice and i want to see more of places.


 A shop called Britain in Holland xD
 Cheese Factory!
 Windmills at the cheese factory ^.^
Amsterdam


 Red light district


Amsterdam


Hyper Japan
For those of you that don't know, Hyper Japan is a Japanese cultural event where people will get to taste Japanese food, try out new games, purchase merchandise, manga, kawaii stuff, cosplay, and see special guests. There will also be some freebies given away at the event, this year they gave out free Yakult, eco friendly bags, natural lip balms, sunglasses, sweets and possibly some other stuff I may have missed!
This year the event was held at Kensington Olympia, a much larger venue than last time which is good. Once I arrived on the Friday, the queue was already quite long, but since I was a volunteer, I went straight up to the door and walked in :) (Though I didn't know if I was allowed to do that or not.. I just did not want to wait in the queue as I was by myself >.< ) I spoke to another volunteer and see said that she queued up to get in lol... oh well. Once I was in, I got quite confused and didn't know where to go first. My friends were already inside the venue somewhere, I tried to call one of them but there was no reception inside for me!! So I just walked to my right and scanned around the whole place from there. A random photographer walked in front of me and just snapped away at my face! >=[ bet that was a mug shot and a half boy.
I found them in the lower floor of the venue and we checked out the stalls and played on the Nintendo 3DS. It was pretty cool, but gave me a headache looking at it.
We made these flowers out of napkins for some Japanese festival decorations that were going to be sent back to Japan:

And also wrote messages for them (for the Earthquakes)
Then I had to leave and start my volunteering for the event, I had to stamp peoples hands!
Saturday. Day 2 of volunteering for the event. When I got there, OMG the queue was bloody huge. (Since it was a Saturday, of course it will be busy) I thought to myself "I AM NOT QUEUING UP TO GET IN" So Like I did yesterday, I walked to the front and used the "Exit/Re-entry" door to walk in. Nobody checked me though :/ So that just makes it easy for anyone to just walk in without paying lol...
Again, my role was stamping hands. But then it got a bit too hectic as so many people were trying to get in and the venue was not big enough to let them all in. People in the queue started to complain that it was taking too long (far enough). Then the organiser took the hand stamping away and told us that we couldn't stamp any more and people were not allowed re-entry to allow space for the others to get in. Hyper Japan was over capacity as they were not expecting that large amount of people to turn up!
We got sent outside to do some crowd control and tell the people that they were very sorry and that if they wanted a refund, they can go to the front and queue up to get one. I didn't come across any angry people thankfully (maybe because I was near the front of the queue haha).
Stood out there for about 3 hours? X_X
People kept asking to take photos of me as well (I was dressed as a Japanese school girl, with a cat paw and fox tail attached to the side of my skirt, and big bow on my head lol)
It was embarrassing having to pose in front of all the people in the queue >_< This guy that was from the press (not sure which one) came up to me and asked to take photos, started ordering me around lol *cringe* I have no idea where those photos taken of me from Saturday are, I can't find them! Damn. I only managed to find 2 photos of me, but they were from the Friday (Boo) I can't upload them so just click these to see: PHOTO 1
PHOTO 2
Sunday 10 July 2011
Criss - Cross leggings (Custom)
Whilst going through my tumblr dashboard (as you do), looking at ulzzang fashion, I came across some leggings which I thought really nice. Immediate reaction was "I WANT THEM". I thought they looked easy enough to make, so I gave it try.
Here are the photos I saw, just so you guys can see first:

Those are the only two I came across with the leggings.
And here are mine...

Maybe I should have worn black tights underneath... but too hot.
If any of you want to make them too, here is how I did it:
Step one
Purchase some cheap leggings. I bought mine from Primark for £3! As leggings all look the same anyway, so you might as well save money and be efficient.
Step two
Turn the leggings INSIDE OUT This step is very important.
I then wore them inside out in order to mark off where the first strip should begin. Putting it simply, just imagine that you are going to turn these leggings into a pair of shorts.
I used tailor chalk to mark it off. Make sure you ONLY mark the front!

Note: The photo shows one leg, do the same steps on both.
Step three
Once you've marked the front, you are ready to cut!
Make sure that you cut the front of the leggings only! Be careful not to cut the back as well.
Cut along the side of the legs, and across where you have marked off. Photo below shows where to cut:

Step four
Cut the front into strips like so (I did 11 strips. Depending on your height you may do more or less. For reference, I am 5"2 and half)
Note: The size of strips does not have to be exact, infact varying strip size would be better.


Step five
Arrange the strips into criss-crosses however you want them. Be adventurous and place the strips far apart and in a messy way if you want. It doesn't have to be neat or have a pattern, but depending on your personal preference, do what you like. I personally done mine in a neat way (as it was my first attempt I played it safe).

Line up the edge of the strip to the edge of the back of the leggings and tack it down in place. Make sure you use a light colour thread so that you can see where it is and it makes it easier to take out at the end. The tacking does not need to be neat, it is just a way to keep it in place so it doesn't move when you sew the two pieces together.
Once you get to the end of the leg, you may find that the last strip will not line up properly. Simply cut off the excess material until it is able to line up, as shown below:

Step six
Now that everything is in place, the next step is to sew it together.
Using a sewing machine, do a straight stitch all the way up the side of the leg where you have tacked the strips to the side together.

Finish!
Get an unpicker and take out the tacking that you have done (white stitches).
Turn the leggings the right way around, and you're done!
Ready to wear :)
It should like something like this

Hopefully these steps are easy to follow... If people want a video tutorial i'll be happy to make one ^^~
Here are the photos I saw, just so you guys can see first:
Those are the only two I came across with the leggings.
And here are mine...

Maybe I should have worn black tights underneath... but too hot.
If any of you want to make them too, here is how I did it:
Step one
Purchase some cheap leggings. I bought mine from Primark for £3! As leggings all look the same anyway, so you might as well save money and be efficient.
Step two
Turn the leggings INSIDE OUT This step is very important.
I then wore them inside out in order to mark off where the first strip should begin. Putting it simply, just imagine that you are going to turn these leggings into a pair of shorts.
I used tailor chalk to mark it off. Make sure you ONLY mark the front!

Note: The photo shows one leg, do the same steps on both.
Step three
Once you've marked the front, you are ready to cut!
Make sure that you cut the front of the leggings only! Be careful not to cut the back as well.
Cut along the side of the legs, and across where you have marked off. Photo below shows where to cut:

Step four
Cut the front into strips like so (I did 11 strips. Depending on your height you may do more or less. For reference, I am 5"2 and half)
Note: The size of strips does not have to be exact, infact varying strip size would be better.


Step five
Arrange the strips into criss-crosses however you want them. Be adventurous and place the strips far apart and in a messy way if you want. It doesn't have to be neat or have a pattern, but depending on your personal preference, do what you like. I personally done mine in a neat way (as it was my first attempt I played it safe).

Line up the edge of the strip to the edge of the back of the leggings and tack it down in place. Make sure you use a light colour thread so that you can see where it is and it makes it easier to take out at the end. The tacking does not need to be neat, it is just a way to keep it in place so it doesn't move when you sew the two pieces together.
Once you get to the end of the leg, you may find that the last strip will not line up properly. Simply cut off the excess material until it is able to line up, as shown below:

Step six
Now that everything is in place, the next step is to sew it together.
Using a sewing machine, do a straight stitch all the way up the side of the leg where you have tacked the strips to the side together.

Finish!
Get an unpicker and take out the tacking that you have done (white stitches).
Turn the leggings the right way around, and you're done!
Ready to wear :)
It should like something like this

Hopefully these steps are easy to follow... If people want a video tutorial i'll be happy to make one ^^~
Subscribe to:
Posts (Atom)